About
News
Download
SourceForge Home
Documentation
Tutorials
Logos
Links
Projects
Contact Us
|
|
Tutorial 1: Setting up DevIL in MSVC++
Last Revised: 9:24 PM 07/31/2001
DevIL setup for Windows is fairly straightforward. Of course you need to unzip DevIL
into an empty directory. All files in the DevIL source zip are in the /ImageLib directory,
so make sure "Use folder names" is checked if unzipping with WinZip. After DevIL is
unzipped, double-click on the ImageLib.dsw file to load the workspace in MSVC++.
Directories
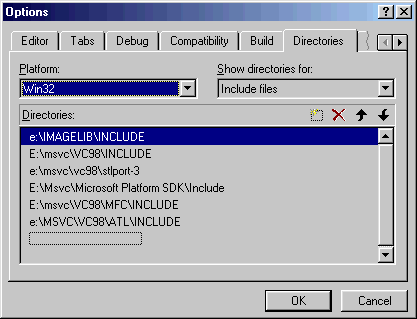
 Some settings need to be altered to get DevIL working. First, navigate to
Tools - Options, then click on the Directories tab. Under
Show directories for:, make sure "Include files"
is selected. Click the New button (to the left of the red 'X'), then type
the directory DevIL is installed in, plus "/include". For example, if you
installed DevIL to E:/ImageLib, enter "E:/ImageLib/Include".
Directory Settings Dialog in MSVC++
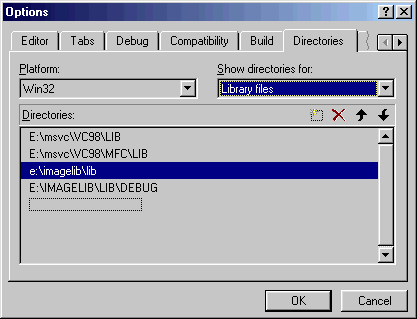
 Under Show directories for:, click on "Library files".
Click the New button (to the left of the red 'X'), then type
the directory DevIL is installed in, plus "/lib". For example, if you
installed DevIL to E:/ImageLib, enter "E:/ImageLib/Lib". Then to add the debug
libraries directory, again click the New button,
then type the directory DevIL is installed in, plus "/lib/debug". In the previous
example, you would enter "E:/ImageLib/Lib/Debug". Just hit OK when you
are finished.
Directory Settings Dialog in MSVC++
Post-Build
If your Windows system directory is C:/Windows/System, you can skip this section.
Go to the Project - Settings menu, then click on the Post-build step tab.
Click on the DevIL project in the left pane. In the right pane, it will say something
similar to:
copy "../bin/DevIL.dll" c:/windows/system
Change the c:/windows/system part to reflect your Windows/System directory. Perform this step for ilu and ilut, and make sure to do it for both the release and debug builds. To switch between debug and release, change the value in the drop-down box next to Settings for: to whatever build you need to edit. Click the OK button when you are finished.
DevIL is now ready to compile. To compile a certain project in the DevIL workspace,
right-click on its name and choose Set as Active Project. Most projects have
dependencies on DevIL, so when you compile these projects, they automatically compile
the needed DevIL files.
Usage
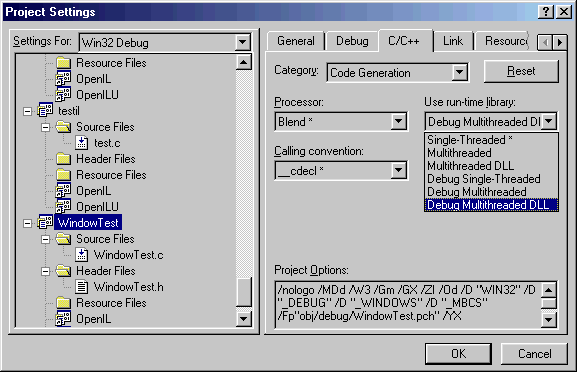
 To properly use DevIL from within your own project, you must set an option required
to let DevIL use file streams. Go into your project's settings (Project - Settings),
and go to the C/C++ tab. Change the Category: box to Code Generation.
If you are editing the debug build of your project, choose Multithreaded DLL
in the "Use run-time library:" drop down menu. If you are editing the release build
of your project, choose "Multithreaded DLL" in the same menu. If this option is not
set, and you pass a file stream to DevIL, DevIL will die a horrible death, because
the file streams aren't shared between processes if this is not set.
Project Debug Settings Dialog in MSVC++
|
